Teddy Bear Cake
This adorable teddy bear cake is surprisingly easy to make, and you can probably make it using pans that you already have in your house. Of course, you can also purchase a character teddy bear cake pan to use as well. Below we’ll show you in detail how you too can make this adorable teddy bear cake for your party.
Bear Themed Cake
Bear themed cakes are so adorable, and surprisingly not all that difficult to do on your own. There are a few different ways you can make bear cakes if you wish.
First, you can use a bear shaped cake pan which may be purchased from your local grocery or craft store. You can also order it online.
Another way you can make a teddy bear cake is a very basic method using pans that you likely have around your house.
Why Make A Teddy Bear Cake?
Not only are teddy bear cakes super adorable, but they are also perfect no matter if you are celebrating a child’s birthday party, or having a baby shower.
Teddy bear cakes work out really well because they can easily be adapted to fit your specific color scheme, and bear cakes are just so cute, it will enhance the theme of your party.
✅Baby Shower Cake
✅Bear Birthday Cake
Now, let’s look at what you will need in order to make an adorable teddy bear cake for your teddy bear themed baby shower, or bear birthday cake.
To Make This Teddy Bear Cake You Will Need:
Tools
Piping bag
Cake decorating tip
Serving platter
Food coloring (optional)
Teddy Bear shaped cake pan OR
2 – 6 inch round cake pans
5 – cupcakes
2 – mini cupcakes
Circle cookie cutter or use the mouth of a glass
Ingredients
Cake
Boxed Cake Mix. Because it’s quick and easy to do, using a boxed cake mix of your favorite brand, simplifies the teddy bear cake. If you want, you can always make your own cake from scratch, however, for this purpose, using a good boxed cake mix is all right. We used chocolate, but you can use whatever flavor you wish.
Frosting
Depending on what theme you were going with, you may like to make your cake with vanilla buttercream, chocolate buttercream, or perhaps a mixture of the two. Below are our favorite recipes for buttercream.
Vanilla Buttercream
1 cup vegetable Crisco
½ cup soft butter (1 stick)
1 pound powdered sugar
1 pinch salt
1 tsp vanilla
1 Tbsp milk
Chocolate Buttercream
1 cup soft butter
5-6 cups powdered sugar
2/3 cup cocoa powder
1 tsp vanilla
¼ tsp salt
¼ cup milk
1 Tbsp chocolate syrup (optional)
How to Make an Adorable Teddy Bear Cake for Beginners
To Make The Cake
To make the cake, prepare your box cake mix according to the instructions. Bake the cake divided amongst two small cake pans, approximately 6 inches in diameter, five cupcakes, and two mini cupcakes.
Bake all of these until a toothpick inserted into the center of each one comes out clean. Remove from the oven and allow your cake to completely cool on a wire cooling rack.
How to Make Creamy Vanilla Buttercream
To make vanilla buttercream, in a mixing bowl combine vegetable Crisco and soft butter. Beat on medium speed until the mixture is creamy.
Once combined, add powdered sugar, salt, vanilla, and enough milk to make it moist. Mix together the mixture until your frosting comes together.
If you want it to be a little thicker, add a little more powdered sugar. For thinner frosting, add a little bit more milk. Keep in mind that a little bit of milk can go a long way.
Use food coloring to dye your vanilla buttercream as desired for your teddy bear cake. Some ideas include dying some frosting brown or tan for the fur of the teddy bear.
Or if you are celebrating a boy baby shower, perhaps you want the teddy bear to be blue, or half blue accents. For a girl birthday or baby shower, add some pink to the teddy bear.
How to Make Decadent Chocolate Buttercream
Make delicious chocolate buttercream, begin by allowing your butter to soften at room temperature. Once it is soft, add your butter to the mixer and beat it until creamy.
Next add powdered sugar, cocoa powder, vanilla, salt, milk, and chocolate syrup if desired. Mix until all of your ingredients are combined. Then proceed to frost your cooled cake.
How to Put It Altogether
To assemble your cake, lay out your cake and your serving platter. Cut off approximately ¼ of two cupcakes using a circle cutter to use the cupcakes as feet.
This allows the feet to fit snuggly against the bear’s body. Then, we removed one of the cupcake tops and used the puffy section for our bear’s nose. This gives it a nice raised nose, that you can easily decorate.
You can also cut out a portion of the bear’s body so the head sits snug against the body if desired. Or you can simply take the two portions of cake together with frosting and tuck the cupcakes into the crack for arms.

Add a thin layer of frosting to the top and sides of your cake. Make sure to add whatever color you intend to frost that area with. This thin layer will help to prevent your cake from crumbling and will help your next layer of frosting to stick to the cake better.
Next, choose whatever color you want for the paws, feet, ears, nose, and even belly if desired. Take a knife and spread the frosting over this area so that it is nicely covered. Keep in mind that in this section the frosting will show through on your finished teddy bear.
Next, choose your desired frosting tip and fill your piping bag with frosting. Pipe the sides of your teddy bear first sticking the pieces together with frosting. Then pipe the frosting to cover all of the sides of your cake.
When the sides of your cake are covered in frosting, it’s time to start decorating on the top of the teddy bear. Working from the outside in, pipe the frosting to cover the teddy bear cake as desired. For a reference on how to do this, check out the video in the recipe card below.
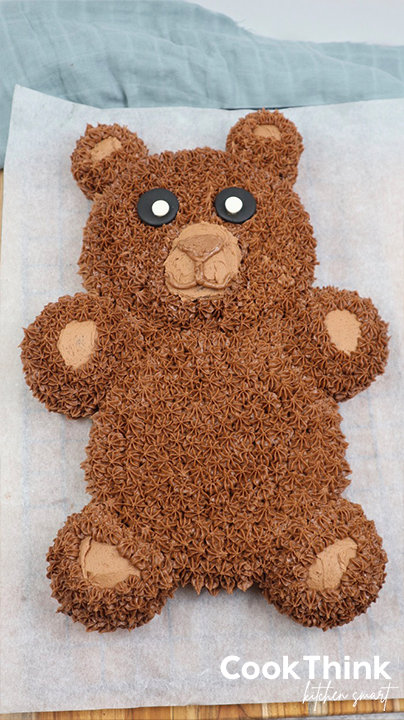
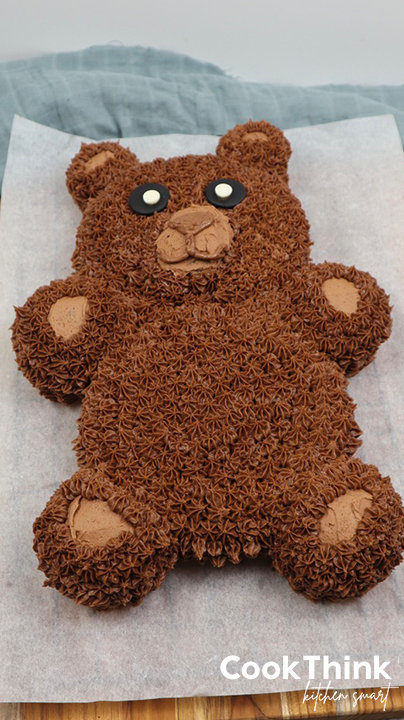
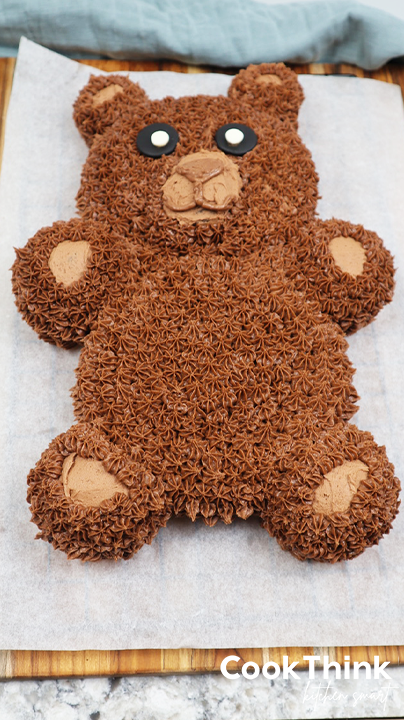
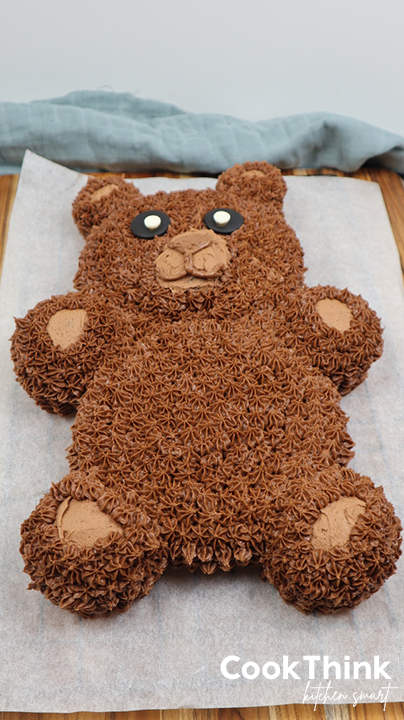
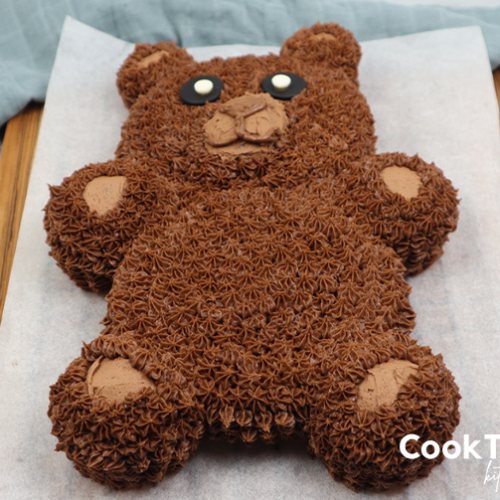
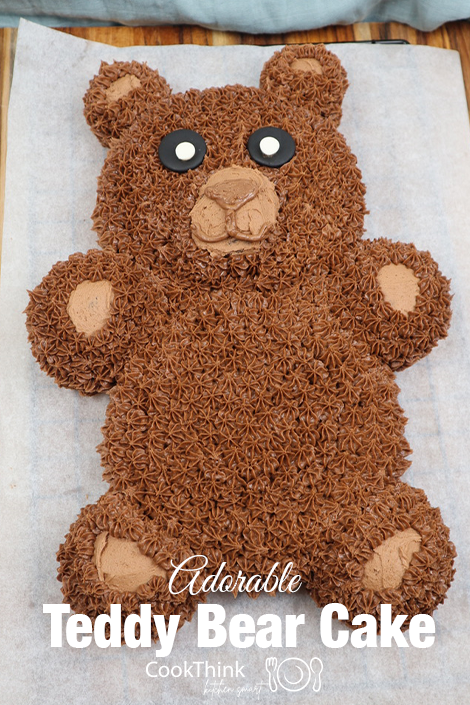
When your entire teddy bear is covered, leaving the paws and part of the ears uncovered, it is time to add the face.
To design the face, we used black licorice coins, with a hole cut out, and white chocolate chips inserted for the eyes. You can then place these eyes as desired. We also decided to pipe a nose and mouth onto the teddy bear.
There are so many different ways you can go about creating the face for your teddy bear, you can simply dye your frosting and pipe the entire face so that it comes out just how you want it. Or you can buy candy eyes and noses for your bear from your local craft store.
The video in the recipe card below will walk you through the step-by-step process with a visual aid of how we decorated our teddy bear cake. However, feel free to get creative, and make any changes to decorate your teddy bear cake just as you want it.
Using a Teddy Bear Cake Pan
The above method walks you through how to make a teddy bear cake with cake pans you probably already have in your house. If you do not have these, and have to go out and buy something you could consider buying a teddy bear shaped cake pan.
There are pros and cons to using a teddy bear cake pan. They are nice because you do not have to worry about shaping your Teddy bear, all you have to do is fill the pan and your cake mix and bake it. Then flip it over and your shape is already there. The cake pan will also create slight indents into your cake, that you can use as a guide for frosting the cake.
However, although the teddy bear cake pans are nice to use, they can be quite costly to buy from the store. Back in the day character cake pans were very popular to use, now however they can be challenging to find, and expensive to buy.
If you happen to come across one, they can help me to make a character cake easily, but if you do not find one or don’t want to spend the money, follow our step-by-step process above walking through an easy process of making a teddy bear cake from scratch.
Tips for Success:
Let The Cake Cool. When you are making any kind of cake it’s important to plan ahead and allow enough time. When you bake your cakes, you’ll want to allow them to completely cool off before you add frosting to them. If you try to frost the cakes too soon, they will simply melt the frosting and you’ll become frustrated.
Frost With A Crumb Layer. We strongly recommend that you press your cake with a light layer of frosting before piping it. This is called the crumb layer, and it will help prevent crumbs from falling into your finished layer of frosting. It also helps your frosting stick to the cake better.
Get Creative! We have given you a guideline for making this adorable teddy bear cake, however, feel free to get creative and adapt this recipe to fit your specific events.
No matter if you’re making this cute cake for a teddy bear themed baby shower, or simply preparing a birthday cake bear, have fun, change the colors up and decorate the bear how you want!
Old Fashioned Teddy Bear
This vintage teddy bear cake is a timeless classic. Even though character pans aren’t very common anymore, you can easily make a teddy bear cake using your average round cake pan, and muffin tins. Making a cute teddy bear cake it’s so fun, and it will liven up the theme of your party!
Happy Baking!
For more posts like this one, follow us on Pinterest, Facebook, Instagram and YouTube.
Teddy Bear Cake
Equipment
- piping bag
- Cake decorating tip
- serving platter
- Food coloring (optional)
- Teddy Bear shaped cake pan OR
- 2 – 6 inch round cake pans
- 5 – cupcakes
- 2 – mini cupcakes
- Circle cookie cutter or use the mouth of a glass
Ingredients
- Boxed Cake Mix or your favorite cake recipe
Vanilla Buttercream
- 1 cup vegetable Crisco
- ½ cup soft butter 1 stick
- 1 pound powdered sugar
- 1 pinch salt
- 1 tsp vanilla
- 1 Tbsp milk
Chocolate Buttercream
- 1 cup soft butter
- 5-6 cups powdered sugar
- 2/3 cup cocoa powder
- 1 tsp vanilla
- ¼ tsp salt
- ¼ cup milk
- 1 Tbsp chocolate syrup optional
Instructions
To Make The Cake
- To make the cake, prepare your box cake mix according to the instructions. Bake the cake divided amongst two small cake pans, approximately 6 inches in diameter, five cupcakes, and two mini cupcakes.
- Bake all of these until a toothpick inserted into the center of each one comes out clean. Remove from the oven and allow your cake to completely cool on a wire cooling rack.
How to Make Creamy Vanilla Buttercream
- To make vanilla buttercream, in a mixing bowl combine vegetable Crisco and soft butter. Beat on medium speed until the mixture is creamy.
- Once combine, add powdered sugar, salt, vanilla, and enough milk to make it moist. Mix together the mixture until your frosting comes together.
- If you want it to be a little thicker, add a little more powdered sugar. For thinner frosting, add a little bit more milk. Keep in mind that a little bit of milk can go a long way.
- Use food coloring to dye your vanilla buttercream as desired for your teddy bear cake. Some ideas include dying some frosting brown or tan for the fur of the teddy bear. Or if you are celebrating a boy baby shower, perhaps you want the teddy bear to be blue, or half blue accents. For a girl birthday or baby shower, and some pink to the teddy bear.
How to Make Decadent Chocolate Buttercream
- Make delicious chocolate buttercream, begin by allowing your butter to soften at room temperature. Once it is soft, add your butter to the mixer and beat it until creamy.
- Next add powdered sugar, cocoa powder, vanilla, salt, milk, and chocolate syrup if desired. Mix until all of your ingredients our combined. Then proceed to frost your cooled cake.
How to Put It Altogether
- To assemble your cake, lay out your cake and your serving platter. Cut off approximately ¼ of two cupcakes using a circle cutter to use the cupcakes as feet. This allows the feet to fit snuggly against the bear’s body. then, we removed one of the cupcake tops and used the puffy section for our bear’s nose. This gives it a nice raised knows, that you can easily decorate.
- You can also cut out a portion of the bear’s body so the head sets snugly against the body if desired. Or you can simply take the two portions of cake together with frosting and tuck the cupcakes into the crack for arms.
- Add a thin layer of frosting to the top and sides of your cake. Make sure to add whatever color you intend to frost that area with. This thin layer will help to prevent your cake from crumbling and will help your next layer of frosting to stick to the cake better.
- Next, choose whatever color you want for the paws, feet, ears, nose, and even belly if desired. Take a knife and spread the frosting over this area so that it is nicely covered. Keep in mind that in this section the frosting will show through on your finished teddy bear.
- Next, choose your desired frosting tip and fill your piping bag with frosting. Pipe the sides of your teddy bear first sticking the pieces together with frosting. Then pipe the frosting to cover all of the sides of your cake.
- When the sides of your cake are covered in frosting, it’s time to start decorating on the top of the teddy bear. Working from the outside in, pipe the frosting to cover the teddy bear cake as desired. For a reference on how to do this, check out the video in the recipe card below.
- When your entire teddy bear is covered, leaving the paws and part of the ears uncovered, it is time to add your face.
- To design the face, we used black licorice coins, with a hole cut out, and white chocolate chips inserted for the eyes. You can then place these eyes as desired. We also decided to pipe our nose and mouth onto the teddy bear.
- There are so many different ways you can go about creating the face for your teddy bear, you can simply die your frosting and pipe the entire face so that it comes out just how you want it. Or you can buy candy eyes and noses for your bear from your local craft store.
- The video in a recipe card below will walk you through the step-by-step process with a visual aid of how we decorated our teddy bear cake. However, feel free to get creative, and make whatever changes to decorate your teddy bear cake just as you want it.
Video
Share on Pinterest!
Hi!
May I use regular store bought frosting. I don’t have access to the ingredients for the
butter cream. However, I do want to pipe it! Help! Please, thank you. Liza
Hi Liza,
You can try using store bought frosting, however often times the kind from the store isn’t as stiff as you need it to be in order to make the piping details.